Navomatic
The Navomatic application shows the use of border components and links to create a navigation component that can easily be dropped into any web page.
In all the Wicket examples, you have to put all files in the same package directory. This means putting the markup files and the java files next to one another. It is possible to alter this behavior, but that is beyond the scope of this example. The only exception is the obligatory web.xml file which should reside in the WEB-INF/ directory of your web application root folder.
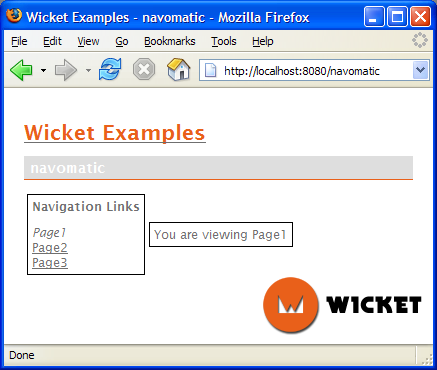
The link in the navigation to the current page is automatically turned into italic text to indicate to the user what page they are on. The first screen capture shows the Page1 page with the Page1 link in italics.
When you click on the Page2 link, you get the following screen.

As you can see, Page1 has no special style anymore, and Page2 is now displayed in italics. Also the message box shows that we are viewing Page2 instead of Page1.
Navigation component
To create a reusable navigation component we are going to use a
org.apache.wicket.markup.html.border.Border component. From the Border
Javadoc:
A border component has associated markup which is drawn and determines placement of any markup and/or components nested within the border component.
The portion of the border’s associated markup file which is to be used in
rendering the border is denoted by a <wicket:border> tag. The children of the
border component instance are then inserted into this markup, replacing the
first <wicket:body/> tag in the border’s associated markup.
For example, here is markup for a simple Border subclass, a usage of that border, and the markup which would be output on rendering:
Border markup
<html>
<body>
    <wicket:border>
        First <wicket:body/> Last
    </wicket:border>
</body>
</html>
Border usage
<html>
<body>
  <span wicket:id = "myBorder">
      Middle
  </span>
</body>
</html>
Rendered markup
<html>
<body>
      First Middle Last
</body>
</html>
In other words, the markup around the <wicket:body/> tag in the border
component is sort of “wrapped around” the body of the <span> tag where the
border is used. This seems simple in this example, but keep in mind that
nested components and even nested borders can appear anywhere in either markup
file. This can be used to create quite complex effects with relatively little
code.
NavomaticApplication.java
Just as in the Hello World! example, we need to define our application. In this case, we set Page1 to be our home page.
package org.apache.wicket.examples.navomatic;

import org.apache.wicket.protocol.http.WebApplication;

public class NavomaticApplication extends WebApplication {
    public NavomaticApplication() {
    }

    public Class getHomePage() {
        return Page1.class;
    }
}
Page1.java
The Page1 Java and HTML files look like this:
package wicket.examples.navomatic;

import org.apache.wicket.markup.html.WebPage;

public class Page1 extends WebPage {
    public Page1() {
        add(new NavomaticBorder("navomaticBorder"));
    }
}
Page1.html
<html>
<body>
    <span wicket:id = "navomaticBorder">
        You are viewing Page1
    </span>
</body>
</html>
Notice that the NavomaticBorder component is attached to the <span> tag
because the name of the component in the Java code is “navomaticBorder” and
the <span> tag’s wicket:id attribute is set to “navomaticBorder”. Because the
two names match, Wicket associates the NavomaticBorder Java component with the
<span> tag.
Page2.java
The Page2 Java and HTML files look almost identical (and we’ll omit the sources for Page3 altogether because it follows the same pattern):
public class Page2 extends WebPage {
    public Page2() {
        add(new NavomaticBorder("navomaticBorder"));
    }
}
Page2.html
<html>
<body>
    <span wicket:id = "navomaticBorder">
        You are viewing Page2
    </span>
</body>
</html>
NavomaticBorder.java
So how does NavomaticBorder work? Glad you asked. The Java code below adds two other components, which are itself borders. Each adds a line around its contents. The rest of the magic is in the NavomaticBorder markup.
package wicket.examples.navomatic;

import org.apache.wicket.examples.compref.MyBorder;
import org.apache.wicket.markup.html.border.Border;

public class NavomaticBorder extends Border {
    public NavomaticBorder(final String componentName) {
        super(componentName);

        addToBorder(new MyBorder("navigationBorder"));
        addToBorder(new MyBorder("bodyBorder"));
    }
}
NavomaticBorder.html
<html>
<body>
    <wicket:border>
        <p>
        <table>
            <tr>
                <td>
                    <span wicket:id = "navigationBorder">
                      <b>Navigation Links</b>
                      <p>
                        <wicket:link>
                          <a href = "Page1.html">Page1</a><br/>
                          <a href = "Page2.html">Page2</a><br/>
                          <a href = "Page3.html">Page3</a>
                        </wicket:link>
                      </p>
                    </span>
                </td>
                <td>
                    <span wicket:id = "bodyBorder">
                        <wicket:body/>
                    </span>
                </td>
            </tr>
        </table>
        </p>
    </wicket:border>
 </body>
</html>
Notice that the markup above encloses the entire contents of the markup file’s
<body> with a <wicket:border> tag, as we described earlier. This lets the
NavomaticBorder know how much of its markup to use when it wraps itself around
the markup it finds in the context where it is used. Notice also the
<wicket:body/> marker which designates where to put whatever is found inside
the tag at the use context.
Next, notice that the navigation links and the border’s <wicket:body/> are
both enclosed in <span> tags which have wicket:id attributes that associate
those tags with the MyBorder components added in the NavomaticBorder
constructor. These nested border components will each draw a thin black line
around their contents.
Finally, the <wicket:link> tag is used to mark the links in the navigation
as automatic links. Ordinarily, you would need to create link components and
attach them to your page manually, but anchor links that are marked as
automatic are parsed and hooked up to link components for you, as appropriate.
Since Wicket knows which page is current, it removes the href attribute for
any link that points to the current page (since the link would be useless).
web.xml
In order to get this application up and running, we need to register the application with the Wicket servlet in the web.xml file. The following sections need to be added to the web.xml in the WEB-INF folder.
<servlet>
    <servlet-name>NavomaticApplication</servlet-name>
    <servlet-class>org.apache.wicket.protocol.http.WicketServlet</servlet-class>
    <init-param>
        <param-name>applicationClassName</param-name>
        <param-value>wicket.examples.navomatic.NavomaticApplication</param-value>
    </init-param>
    <load-on-startup>1</load-on-startup>
</servlet>
<servlet-mapping>
    <servlet-name>NavomaticApplication</servlet-name>
    <url-pattern>/app/*</url-pattern>
</servlet-mapping>